


LANDSCAPE
A vast majority of landscape photography in the Gallery is panoramic. This means that such a photograph is made up by a great number of individual shots. The result of this is that such a photograph is much detailed than a photo of the same shot taken just at one click. Therefore, it is possible to print these photographs in large formats with high-quality resolution. You can get the idea of what a sharp detail looks like when considering a specific photograph from the following picture. On the left there is a city of Stirling in Scotland that I took picture of from The National Wallace Monument, which is situated 2 kilometres far from the city. Actually, it is my biggest panoramic view ever, and it is composed of 34 individual pictures. The photograph on the right shows the detail of the picture on the left.

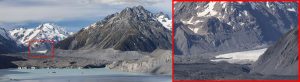
As a second example of a detail of landscape panoramic photograph, I used a picture from New Zealand, specifically the Tasman Glacier in the Mount Cook National Park. This panorama is made up by 18 individual photos and the picture on the right shows a detail of this panorama, which was 17 kilometres away from the place of the shooting location.
The shooting of panoramic landscape itself has its own specifics. Firstly, you have to pay much greater attention to taking photos. Secondly, a stable tripod is a must-have, so that the photos are always sharp, a perfectly focused lens, and a suitable camera setting. Thirdly, shooting of the photos must be fast enough because of movements of clouds, cars, trees in the wind and the like.
MOON
Full moon shooting may seem quite easy. And really. Just check the calendar and see when the full moon is. But if I want to take a photo of the moon at full phase with an interesting landscape feature then it is not that easy. As an example, let us look at my picture of the moon over Lysá Mountain (1323 m). What is behind the picture? At the beginning there was an idea. What about taking a photo of the moon with a dominant feature of our region, i. e. Lysá Mt., so that the moon is exactly behind the peak of Lysá Mt. and the communications tower? Is that even doable? What do I need to know in order to do that?
First of all, you need to find an azimuth where the moon is rising this particular month. It may not seem that important, still every month the moon rises at a little bit different place. This means that if I have a specific point in the landscape that I need the moon to be behind, and I know that in March the moon rises on this azimuth, in April on that azimuth and so on, and I know that the moon is moving to the right at some angle, I have to find a place where to stand so that I have the moon exactly behind the transmitter at the right time. When I took this photo in April 2017, I had newly installed Photopills application that was released for Android a month earlier. At first, I tried to get acquainted with the app and I tested it in a terrain. With the help of maps and simple math I made a layout of the ideal point with a specific altitude, and because I know the altitude of the transmitter and the azimuth of the moon rise, I calculated the time when the moon was going to appear behind the transmitter. Because I wanted to be absolutely sure about the most ideal shooting place, I went to see the slopes of Skalka Mt. one day ahead. The next day after work, I went to this theoretically most suitable point, positioned my tripod, focused camera exactly in the direction of the transmitter and set the composition. One more time I checked the place with the app, and breathlessly waited if everything went well. The expected time for the moon to appear behind the transmitter was 7.12 pm. At 7.07 pm the moon began to peek behind the slope of Lysá Mt., then for a short time it disappeared behind its peak, but after that it appeared exactly on the spot I had hoped for. I was shooting the whole time, and at the same time hoping to capture the moment when the transmitter is in the centre of the moon. There was no time to check it immediately, and so I kept squeezing the button. At about 7.20 pm when I finished shooting, I began going through the pictures and I was delighted to see that there was such a photo that I had wished for and it was exactly the moment that I had wanted to capture. My joy was immense. The following day I cut out the picture and slightly adjusted it, so that it looked as it should. And I posted it on Facebook. The picture was a great success, many people liked it, and I was, of course, pleased with that. As it is my aim to see the possibilities of planning such a complex composition, but also to show that even in our country it is possible to take such an interesting photo of the moon when you prepare yourself enough and spend time on it.
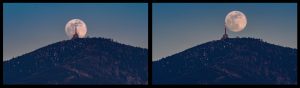
7.11 pm 7.13 pm
Without a doubt, the weather condition is a key factor for the full moon shooting. It happened several times that I had prepared an interesting shooting, but because it was cloudy, it was for nothing. As I wrote earlier, every month the full moon appears on a different azimuth. In practice it means that if I plan some shooting in June and it is cloudy, this idea can be accomplished again in one year’s time. But from time to time all the conditions are fulfilled, and now and then you make an interesting photo.
MILKY WAY
In comparison with daylight landscape photography, astrophotography is much more demanding in relation to equipment, the process of shooting itself and processing. My favourite object in the night sky is Milky Way. In our conditions it is best shot in the period from April to October at night, of course. During this period you can see the core of Milky Way. The core represents the most colourful and attractive part due to light; all that is even more appealing as the part of Scorpio constellation is visible. The most ideal for shooting are nights without moonlight, and to be as far from the light pollution as possible. A great advantage of my region is the well-known Beskydy dark sky area in the Beskydy Mountains. This area truly offers unique conditions for such a type of shooting.
For the shooting itself, it is necessary to have a low-light lens, a stable tripod, remote trigger, and warm clothes. A year ago, I bought a Sky-Watcher Star Adventurer motorized mount, which at the right setting enables rotating the whole mechanism at the same rotation speed as the one of the Earth. Therefore, it is possible to shoot long exposures without stars being blurred, where the ISO figure may be low.
It is important to understand that even if it is not visible with the naked eye, the Earth rotates and stars appear to move relatively fast in the sky. If my static tripod is set in order to avoid star paths, caused by the rotation of the Earth, I can set the exposure approximately for 15 or 20 seconds at a focal point of 17 mm. In order to compensate for this short time, it is necessary to increase the ISO figure, which makes the sky and Milky Way more visible, but at the expense of noise.
Based on this description it is obvious that taking such a photo is time-demanding. And yes, everything starts with an idea of capturing a photo. I have a vision and then ideally directly on the spot or by an examining previous photos or shots on the internet, I need to find out if it is doable in the landscape where I want to be. If it is possible to take pictures of Milky Way, and if Milky Way is likely to be in the position. Thanks to Photopills app I can check this ahead. I can find out when Milky Way appears in the given area, until what time I can shoot, because of astronomic night, and what the phase of the moon it is. The moon by its own light attenuates the brightness of stars, and the night is not pitch-black. As soon as I learn this information, I follow the weather forecast and I hope for a clear-sky night. As I mentioned earlier, it is essential to get to an area with the smallest light pollution, and so going to such an area followed by night hiking is an inevitable part of this. Then, it is crucial to prepare, set, adjust, and focus thoroughly, and the shooting itself can start; which usually takes tens of minutes. When a photographer is somewhere at night having clear skies, it often happens that he uses this night out for taking pictures of sunrise. The photographer returns home in daylight, pretty tired but at the same time delighted. The whole process is not over yet. After well-deserved sleep, the photographer needs to go through the obtained data. If I managed to acquire what I had planned, then I very often spend hours on post-processing.
MACROPHOTOGRAPHY
Thanks to my profession, geology, I got to macrophotography quite easily. A few years ago, I was asked to take as much detailed photos of ammonite fossils as possible. Soon after I realized that it was not that simple. I read loads of articles by highly-experienced photographers, who capture living nature mainly. In my case, it was much uncomplicated as those samples did not move. Still, the principle is basically very similar. The aim is to obtain in great detail as a sharp photo as possible within the whole depth of a sample. You cannot do this with just one click. As I wanted to deal with macrophotography even more, I bought a special macro lens Canon EF-S 60 mm f/2,8 Macro USM, which I immediately fell in love with. In the first phase of shooting minerals, I study the given sample thoroughly, so that I know what the most interesting part is, and what I want to capture. In the second phase, I deal with lights. I place the sample into the lightbox diffuser, with one or two lights illuminate the sample appropriately, and I set the camera for shooting. It is crucial to make the sample perfectly still, put the camera with macro lens on the tripod, set the right angle, and start taking a series of photographs of the same setting, but different focus. It is quite normal to take 40 or 60 shots just for one detailed photo. When a sample is more complex, I can take 100 or even 150 shots. This, of course, has a direct impact on the length of shooting. Then, creating the final photography is the next step. With the help of suitable software and mathematical functions I compose just one photo made by tens of photographs. From every photo it takes the one with the sharpest part that is sharper than the same part in other photos. The outcome of this puzzle is a high-quality detailed photograph composed by tens of pieces. Simply said, in order to get one macro-photo of a mineral, I usually need 2 hours that include preparation, shooting and processing.